Notes from Carola Russell’s one hour lecture about:
Needles & Thread: what they mean to each other and the fabrics they are stitched through.
In our lives, there are rules to live by. Then there are rules that can and cannot be broken.Read More »
Notes from Carola Russell’s one hour lecture about:
Needles & Thread: what they mean to each other and the fabrics they are stitched through.
In our lives, there are rules to live by. Then there are rules that can and cannot be broken.Read More »
Thank-you for purchasing Rachel’s Garden Quilt Pattern at Carola’s Quilt Shop booth at a recent sewing or quilt show. Read More »
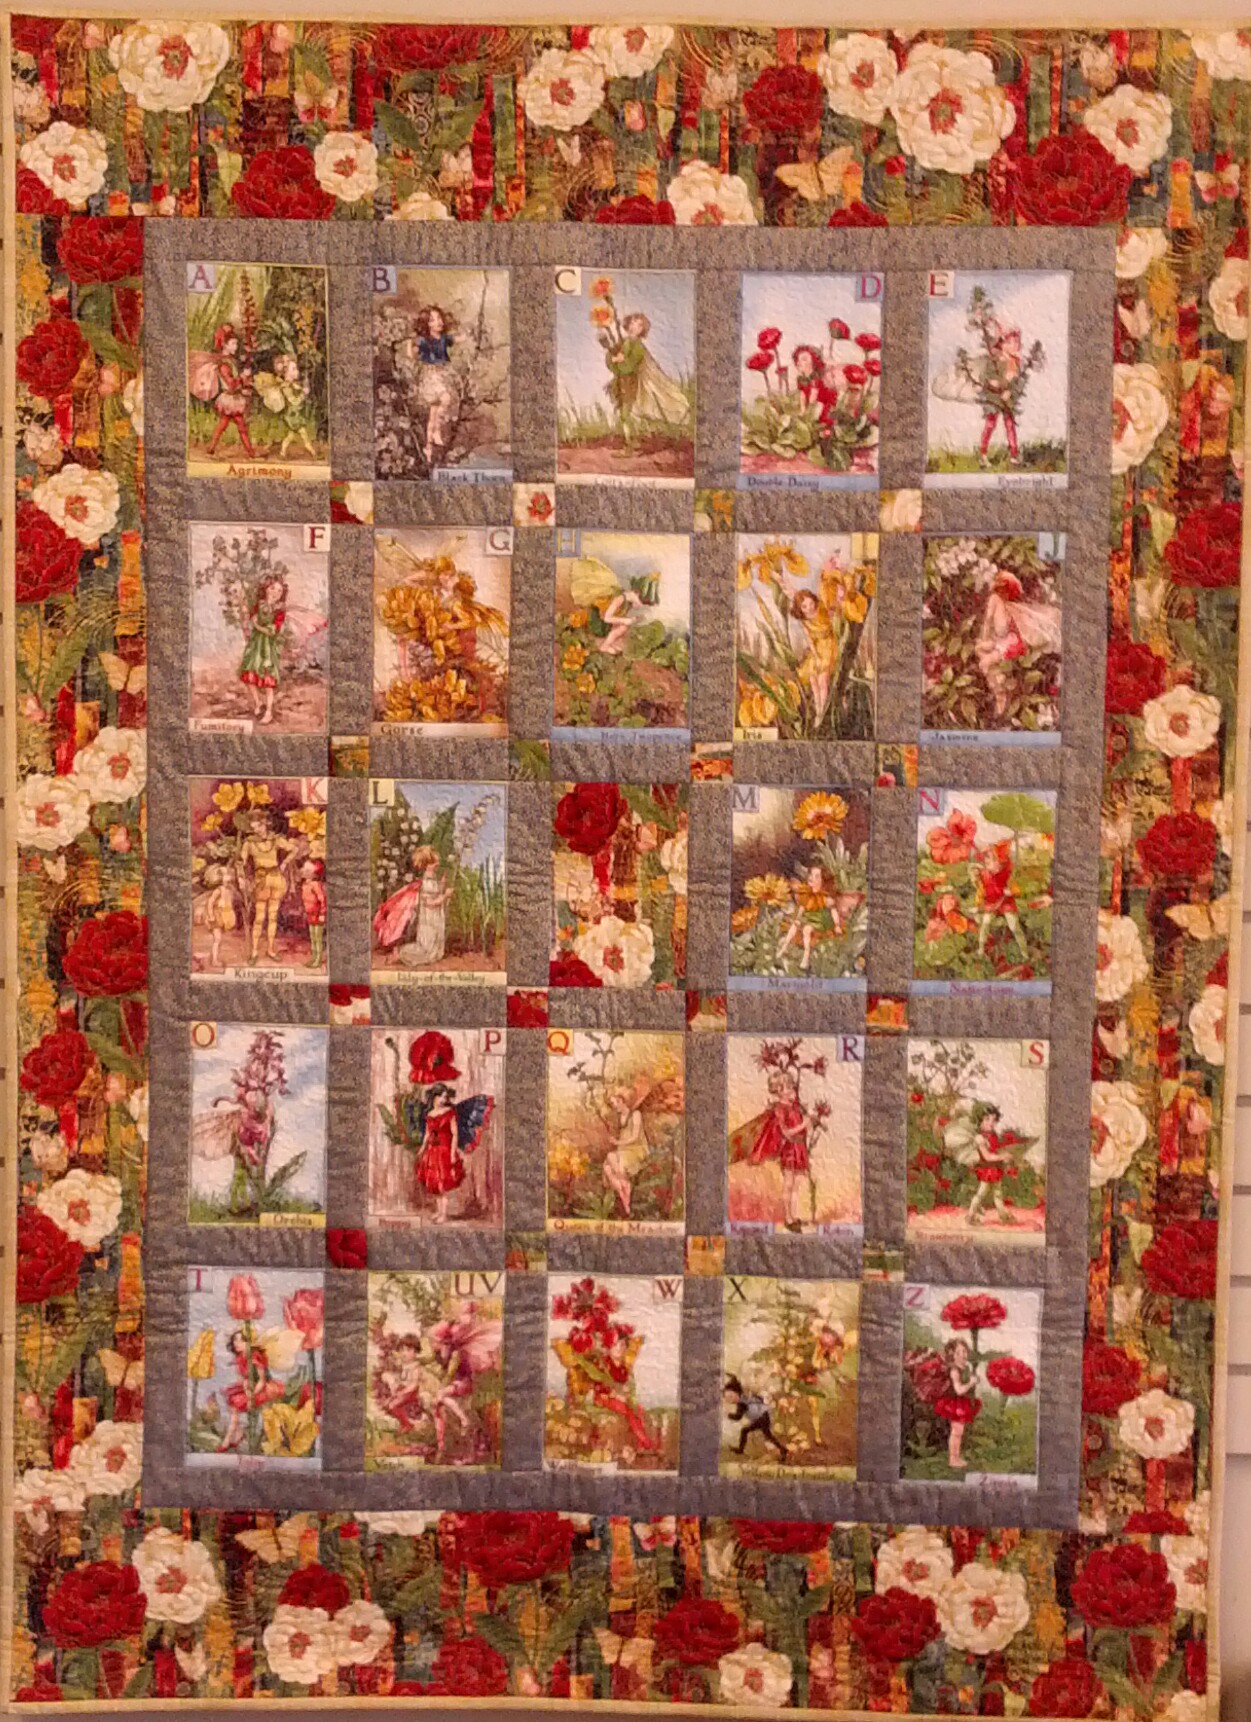
Finished size:
104cm x 142cm (41” x 56”)
You will need:
One Alphabet Fairy Panel
1 metre (1 yard) floral print for border, cornerstones & center block of a non-directional fabric.
If the border fabric is directional purchase an additional 1/2m (5/8 yard)
.60m (5/8 yard) sashing fabric
.40m (3/8 yard) binding fabric
How to cut out the 24 individual alphabet fairy blocks from the panel:
Use a rotary cutter ruler and mat. The black “outlines” of the blocks will be the straight guide for cutting. Cut out each block with a scant 1/4 seam allowance
(There is not enough fabric between blocks to allow for a wider seam allowance)
The individual fairy panels should measure 5 1/4″ x 7 1/2″
*DO NOT START CUTTING until you are confident that each block will have an adequate, although small, seam allowance.
Some of the blocks many seem crooked, askew. Ignore this because the blocks will square themselves up perfectly when the sashing is added later.
You will need 25 blocks for this quilt. The fairy panel will only provide for 24 blocks. Cut an extra block 5 1/4″ x 7 1/2″ from the border fabric or other floral fabric that coordinates well. (See center of our quilt)
From the floral fabric 16 – 1 7/8″ squares for the cornerstones between all the fairy panels.
From the sashing fabric cut 12 – 1 7/8″ wide strips
Layout the blocks alphabetically, five rows of five blocks. The extra floral block will be exactly in the center, in row four, block #3.
Set up your sewing machine with a shorter than usual stitch length 2mm.
You will sew a SCANT 1/4″ seam allowance. Test stitch a seam and measure. If your seam allowance is accurate the stitching will be on the outer black line of the block.
Vertical sashing between panels:
Cut sashing strips 7 1/2″ long. You will need 20 pieces.
Stitch a piece of sashing to the right side of every fairy block except the last block in each row (set aside E J N S Z)
Stitching together each row:
Row one: Stitch block #1 to block #2, continue joining until all five blocks are sewn together including “E”. There will be a sashing strip between each block.
Stitch the remaining four rows into strips in the same manner.
Horizontal sashing between sashed-block rows:
To make horizontal sashing strips to be stitched between row one, two, three and four:
From the sashing fabric strips, cut 25 – 1 7/8″ x 5 1/4″ rectangles, five for each row. Join these in a row with a 1 7/8″ square cornerstone between each sashing rectangle.
Join the five rows of fairy blocks with one of the four horizontal sashing strip units between each row. Use pins for accuracy.
The fairies are now one complete unit of 25 blocks.
Add a sashing strip to each SIDE of the complete fairy unit.
Add a sashing strip to the top and bottom of the complete fairy unit.
Adding the floral border:
Stitch a 5″ wide border strip to each SIDE of the quilt top.
Stitch a 7″ wide border strip to the top and bottom of the quilt top chose a wider border for the top and bottom to make a rectangle.
Sandwich the Fairy Quilt for quilting. We used a green marbled fabric for the back and a cotton blend batting.
The binding was made with a metallic gold on cream fabric, 5 – 2 1/2″ wide strips cut from selvage to selvage.
Our quilt was first quilted in the ditch using a longer 3mm stitch length with a walking foot attached. Next each fairy panel was free motion quilted using a small stipple stitch. We did not quilt the fairy, just around the fairy.
Finally the outer border was quilted with a larger free motion stitch.
This quilt does not need to be free motion quilted. Any style of quilting will look great!

Hi Everyone,
In this post I am sharing a few tips and tricks for patchwork success. You may be a novice, a happy quilter, a frustrated beginner or professional piecer. Read through the checklist below and see if one of the points on the list may be the missing piece to your Patchwork SuccessRead More »
Hi Everyone, Thank-you for coming to our 10th Annual Christmas Open House. Below please find links to all the demonstrations that you saw on the 30th of November. I am definitely getting an Infinity Scarf this Christmas! Happy Holidays! CarolaRead More »
Hi Everyone, Thank-you so much for coming to my presentation. As promised here are the instructions and links to help you try out some of the projects. Have Fun!Read More »
Last weekend was a weekend to dye for at Carola’s Quilt Shop!
All twelve of us created a one of a kind Improvisational Pieced Quilt Top. Most of us came to class without any preconceived plans except a big pile of fabric scraps.Read More »
This quilt was inspired by the article in Quilting Arts called Color Play by Anne Lullie . I completed the project in the article as an exercise to hone my color composition skills of which I am lacking. I realized that it was time to embrace the color wheel.
Here is my story.Read More »
